We no longer sell or support the Efergy Engage Hub, but the following guide may assist past customers and other users.
Please see our current range of electricity monitors and solar energy monitor for some newer options.
We offer a two-year warranty on all of our energy monitoring products.
* * *
This guide is current as of 2019, around the time we stopped selling Efergy Engage.
Efergy Engage Hub Set-Up Process
Step 1) Plug in, Power Up, & Register
Connect the Hub to power and plug it into an ethernet port on your internet router.
Place alkaline (not rechargeable) batteries into your transmitter. If you have multiple transmitters, keep them nearby but install batteries in one unit only for now.
Then, go to engage.efergy.com/user/register and create a new account.
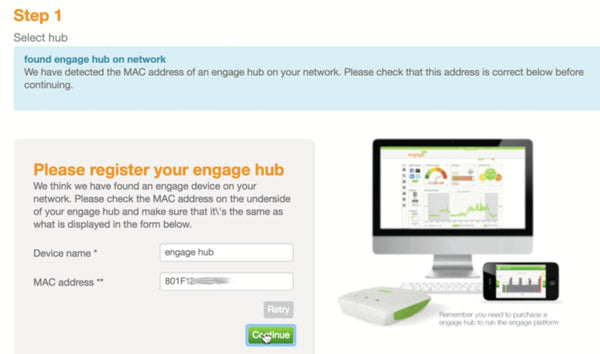
After clicking 'Next' your Hub should be detected on your network per below.

Note: the 'MAC address' can be found on the base of your Hub.
Step 2) Add Your First Transmitter
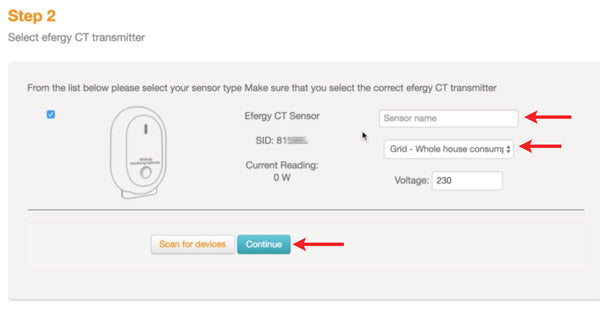
At Step 2 the system should detect the transmitter that you placed batteries in above.
IMPORTANT: The first transmitter must be set as Grid - Whole house consumption / PWER from the dropdown menu. You can name it however you like in the 'Sensor name' section.

Adding your first transmitter.
Step 3) Location & Currency
At step 3 you will be asked to enter some basic details about your system.
Simply enter these details and then click 'Next'.
Step 4) Add Extra Transmitters
If you have any extra transmitters, now is the time to add batteries to these devices.
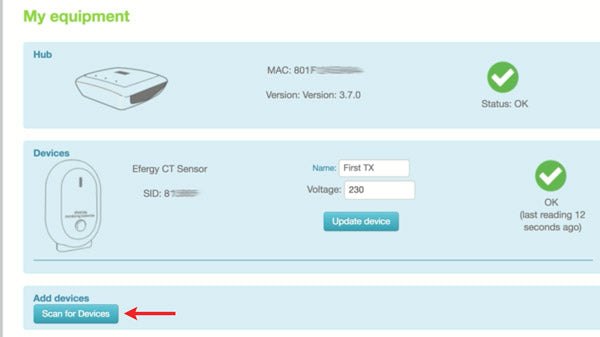
Then click "Scan for Devices". This can be found in Settings > My Equipment.

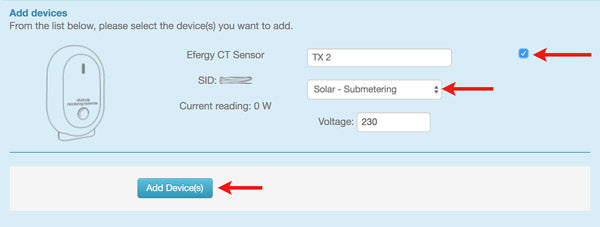
IMPORTANT: Any extra transmitters must be set as Solar - Submetering / PWER_SUB from the dropdown menu. This is regardless of what it is measuring. The checkbox must also be selected to add a transmitter.

Don't forget to check that pesky checkbox!
Step 5) Install The Sensors
The final step is to install the sensor clamps and transmitters at your switchboard. See installation graphic below for details.
See also: How to Check if You Have 3 Phase or Single Phase.
Step 6) Start Saving Energy!
Now that your Engage login is set-up you can get on with saving energy. You can use the platform to do things such as:
- Check your energy usage at different times of day.
- Make the most of your solar panels if you have solar.
- See instantly how much your appliances consume.
- Check overnight standby power usage.
Efergy Engage Troubleshooting Tips
If you follow the above installation sequence you should not encounter any issues. If you do have any issues, please review below:
Can't detect Hub at Step 1
- Choose to enter the MAC address manually and try again.
- Ensure your router is not blocking ports with a firewall or other software.
- Reboot your internet router, then reboot the hub, and try again.
Can't detect Transmitter at Step 2
- Ensure the Transmitter is within a few metres of the Hub for this initial set-up. You can move it away again later.
- Remove and replace the batteries, and try again.
Can't detect Transmitter at Step 4
- Ensure it's close by (as above).
- Try 'Scan for Devices' again, and while the software is scanning, press the button on the transmitter a few times.
- Don't forget to check the checkbox before clicking "Add Devices".
Readings do not make sense at Step 6
Incorrect readings are typically a result of the sensor clamp being installed in the wrong location at your meter board. See simplified diagram below:

Efergy Solar Energy Monitor Installation.
The Efergy Engage Hub Online Dashboard
The Engage Dashboard displays the readings of the Efergy Engage wireless energy monitor. When you first log in, information about your system is presented in several sections (called 'widgets'). Here's what the dashboard looks like:

Efergy Engage Hub - Real Time Usage
This section displays live power readings in kilowatts (kW) from each transmitter connected to the Engage System. Click on the name of each to display it. In this example, 3 transmitters labelled PV, AC and Heat Pump are shown with PV power being displayed.
The colour surrounding the power reading gives an indication of power:
- blue - low (less than 500W)
- orange - medium (between 500W and 1kW)
- red - high (above 1kW)
The indicator spinning around will also speed up as power usage increases. Together the colour and spinning indicator give quick visual feedback on power levels being monitored.
Tip: If you want to change how your transmitters are labelled, head to 'Settings' -> 'My Equipment' then change the name & click 'Update Device'.
Efergy Engage Hub - Budget Widget
Here you can track energy use in dollar terms against a budget you nominate.
- Click the widget's 'Settings' button and select your currency.
- Add your electricity rate in cents per kilowatt-hour (kWh).
- Set a budget in dollars.
- Click 'Update' then head back to the main Dashboard page.
This will be your target expenditure on a monthly basis. The electricity rate is a single tariff, check your electricity bill for the rate you pay.
Once setup, the widget will display expenditure so far, the target you've set & an estimated spend based on your energy usage trend. This estimate updates daily to reflect changing usage patterns.
Tip: Your bill may have multiple tariffs based on time of use or daily surcharges. If so, you can still enter an average figure so the Budget Widget can provide an estimate. Take an electricity bill and divide the total bill's dollar figure by the energy (in kWh) used in that period.
Efergy Engage Hub - Cost So Far
Three circles are presented in 'Cost So Far' and clicking on any of them will bring them to the front. They are:
- Today - Estimated cost of electricity used today on a rolling 24hr period.
- This Month - Estimated cost of electricity used this month.
- Since - Estimated cost of electricity used since a nominated date. To set this, click the small 'i' in the lower right-hand corner of the widget.
Tip: The dollar values displayed are directly proportional to the energy you use. If you're more interested in monitoring energy than cost, you can enter a tariff rate of 100 cents per kWh. Then the displayed figures will directly equate to your energy usage. Eg if if the 'Today' section shows $4.5, it means you've used 4.5 kWh so far today.
Efergy Engage Hub - Energy Demand
Daily energy usage is graphed here, with power (kW) along the vertical axis and time along the horizontal axis (bottom of the graph). Each transmitter will show up as a seperate line on the graph. To navigate:
- Show or hide a line on the graph by clicking the corresponding transmitter label along the bottom.
- Click the forward or back arrows around the date to change the displayed date.
- Hover over the graph to show the power readings at specific times for each transmitter.
Tip: You can 'zoom in' on the graph by selecting an area of interest. Click and drag over the area then let go. You can continue zooming in till just a few minutes of energy use are displayed if needed. To zoom back out, click 'Reset Zoom' in the top right-hand corner of the graph.
Are you ready to monitor your energy usage?
Browse our current range of power meters and wireless energy monitors. And see our new solar power monitoring system.


